 The BEE SuiteChildcare CRM & Operations
Step-by-step help for every BEE Suite user.
Choose the guide that matches what you need: Parent Portal setup, payments, classroom use, school administration, billing, or check-in.
Director take-home hub
One destination for 36 captioned tutorials, 50 task guides, the suite overview, marketing downloads, the parent referral program and enrollment-form help. School downloads require an authorized sign-in; tutorials use synthetic examples.
Open the director take-home hubAdd the Parent Portal to Your Device
Add the Parent Portal to the Home Screen on an iPhone, iPad, Android phone, Fire tablet, or computer.
Use Safari, Chrome, or Silk
Save to home screen
Log in and check child dashboard
Screens
Tap a screen to open the full view.
Step-by-step guide
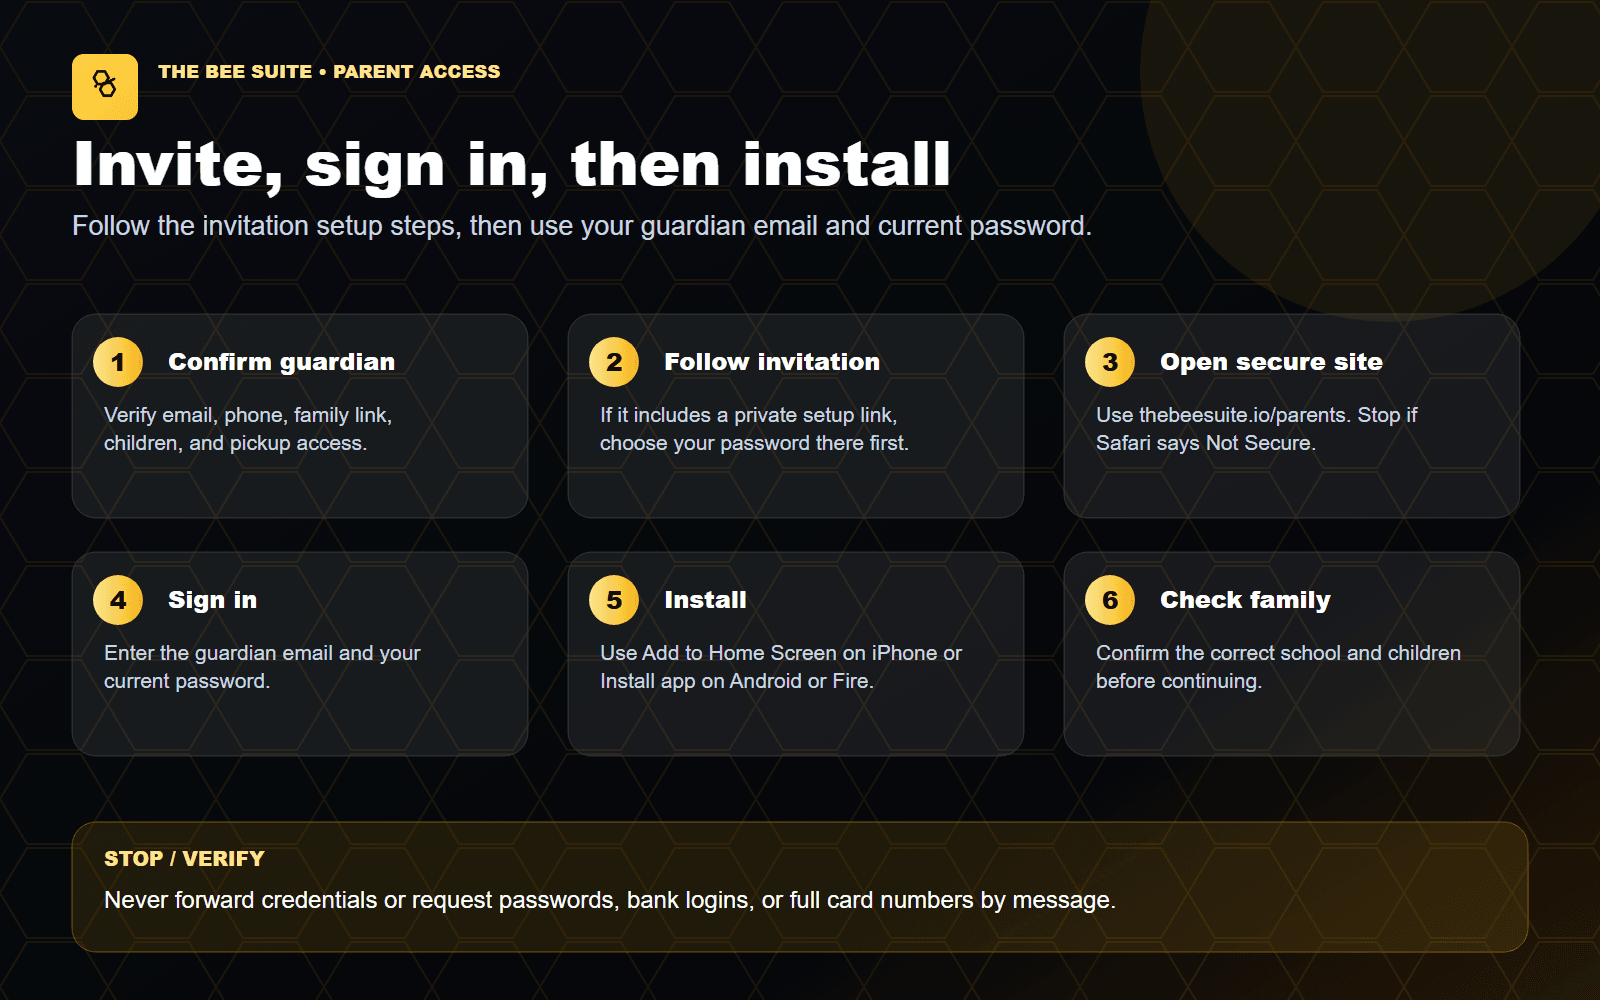
- 1Open https://thebeesuite.io/parents and confirm the address starts with https://thebeesuite.io. In Safari, stop if the address bar says Not Secure.
- 2If your invitation includes a private setup link, use it to choose your password first. Then sign in with the guardian email and your current password.
- 3Confirm the correct family and child records before continuing.
- 4On iPhone or iPad, use Safari Share > Add to Home Screen. On Android or Fire, use the Chrome or Silk menu > Install app or Add to Home screen.
- 5Open the new BEE Suite icon and sign in again if the device asks.
- 6Use Forgot password if you forgot your current password. Never share or forward a private setup link or password.
Card, Bank, and Autopay Payments
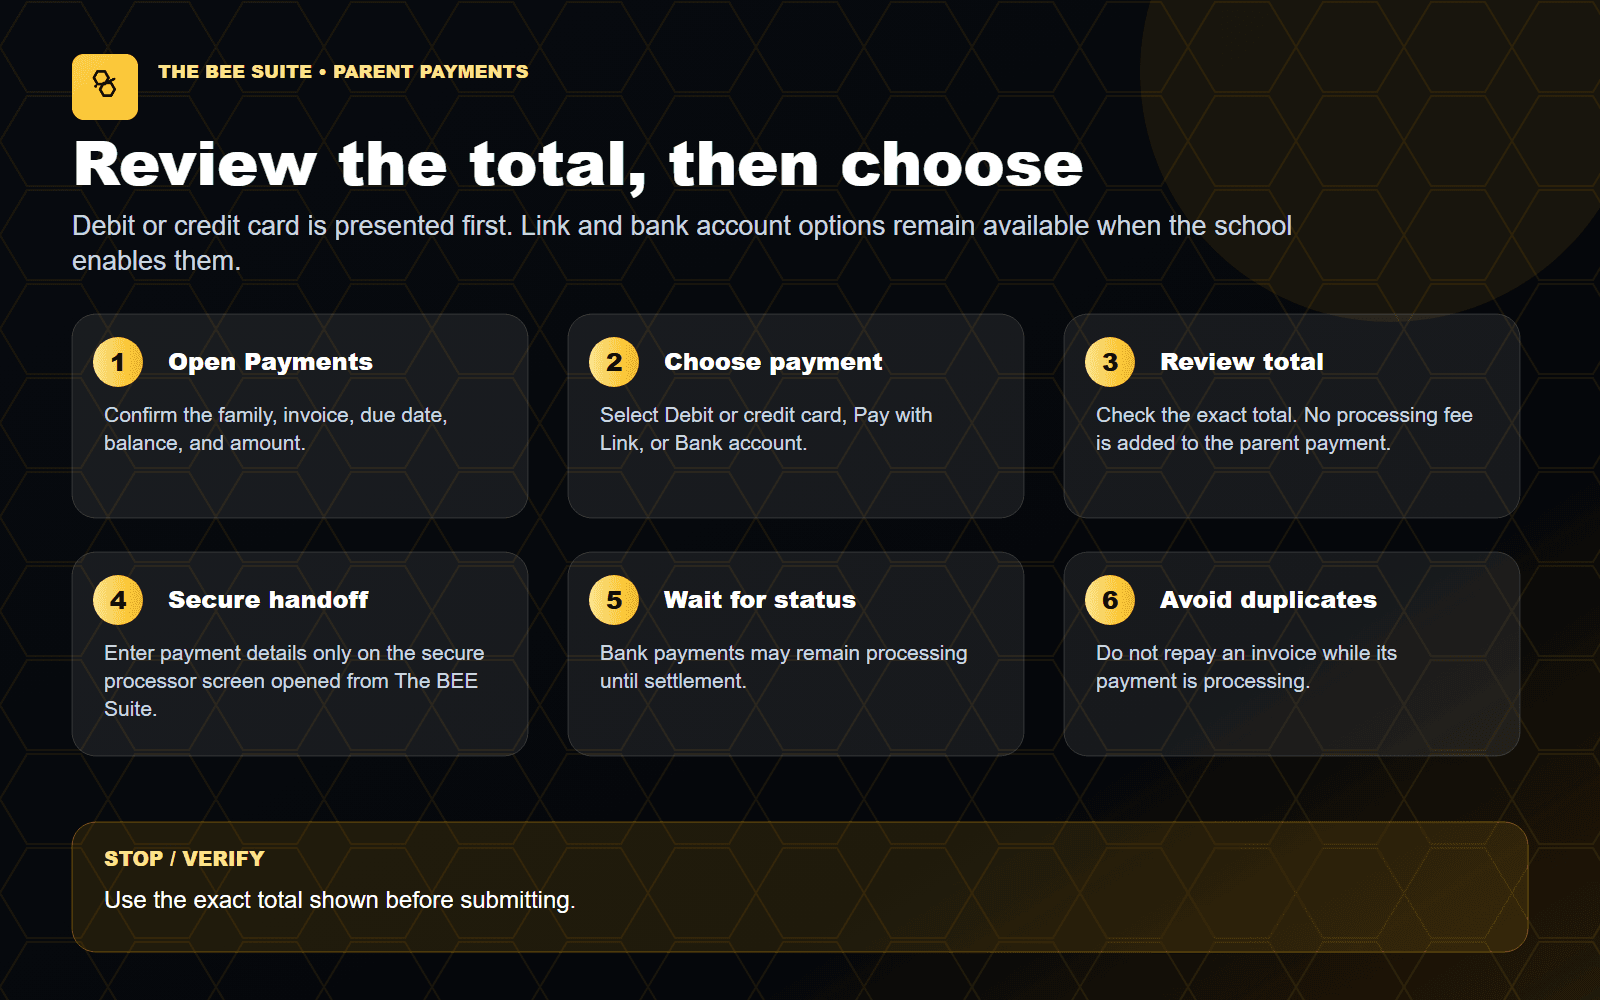
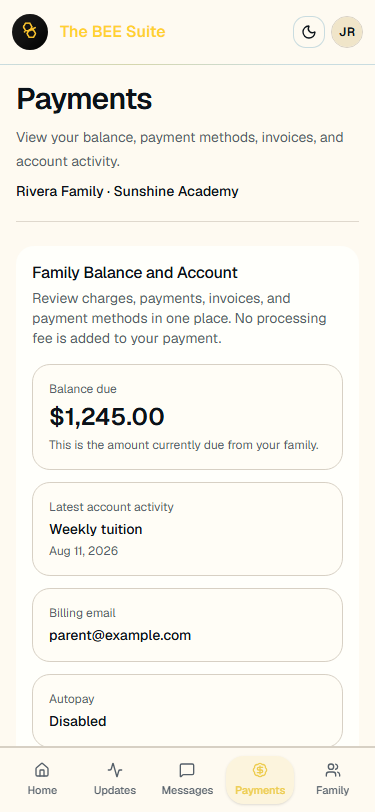
Save a card or bank securely, choose a payment option, and review the exact total before submitting.
Card, Link, and bank options
Use only the secure handoff
Review total and payment status
Screens
Tap a screen to open the full view.
Step-by-step guide
- 1Open Payments and confirm the correct family, invoice, and amount.
- 2Choose Save card to save a card, or Connect bank account to save a bank account.
- 3For an open invoice, choose Debit or credit card, Pay with Link, or Bank account.
- 4Enter payment details only inside the secure payment processor screen opened from The BEE Suite.
- 5Review the exact total before submitting. No processing fee is added to your parent payment.
- 6Wait for the confirmation and current status. Do not repeat a pending bank payment or setup attempt.
Parent Portal Daily Use
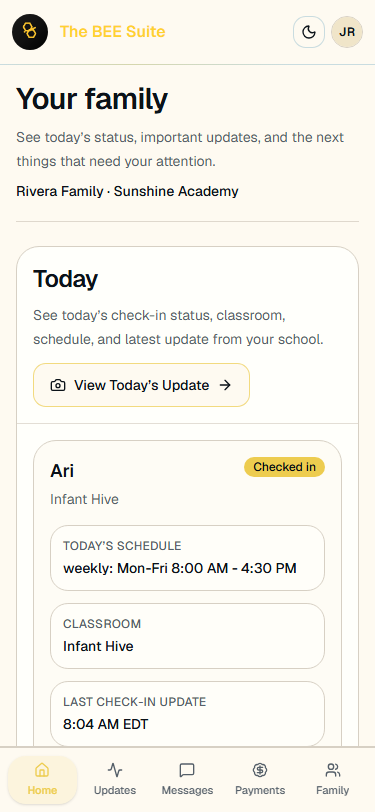
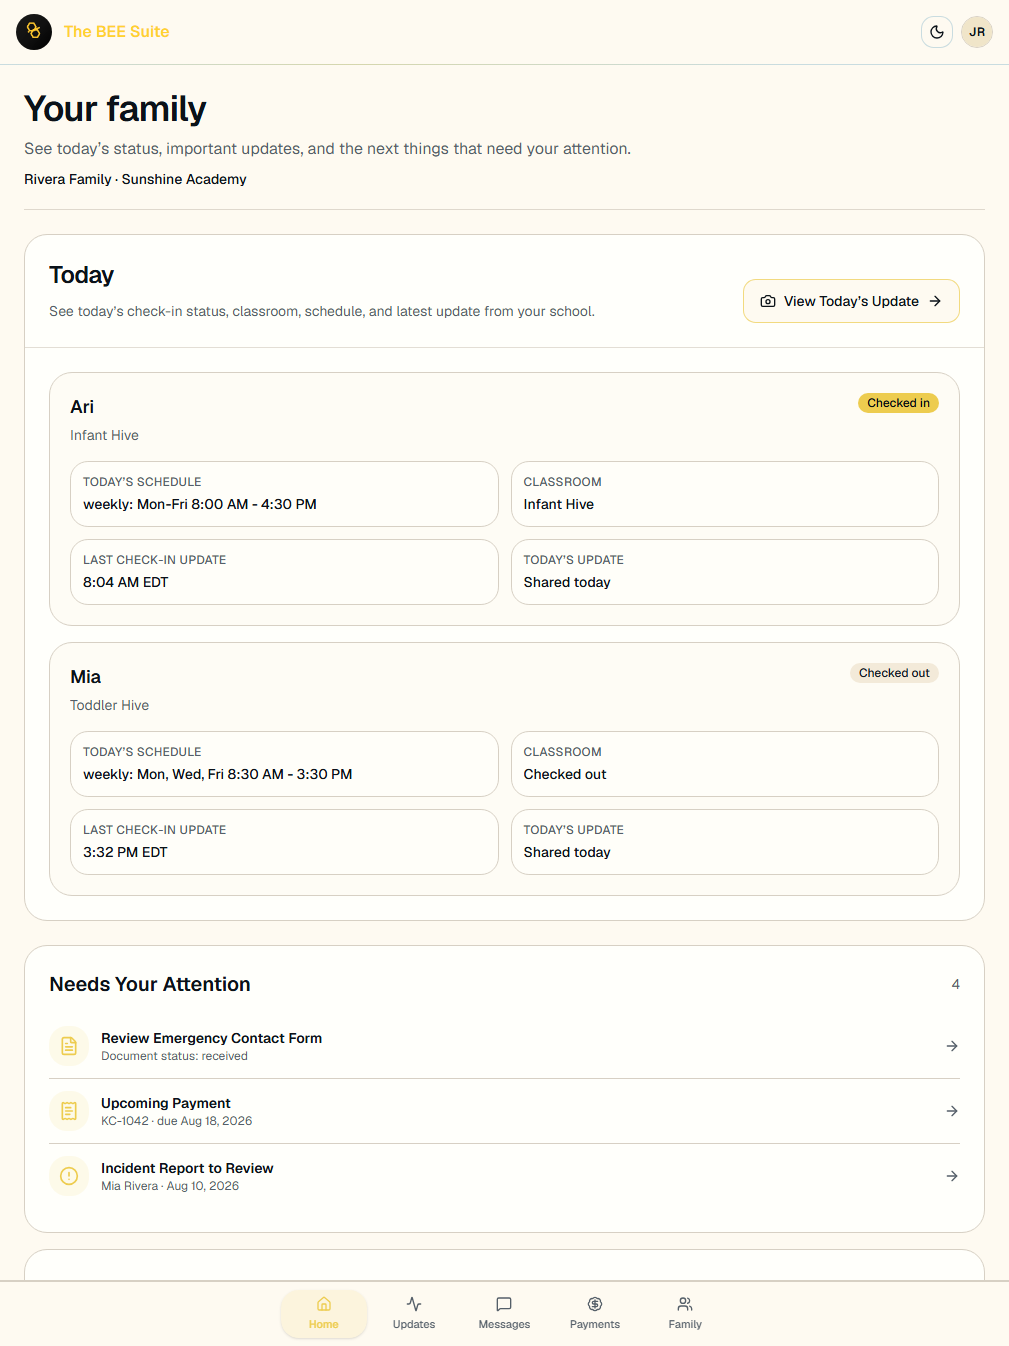
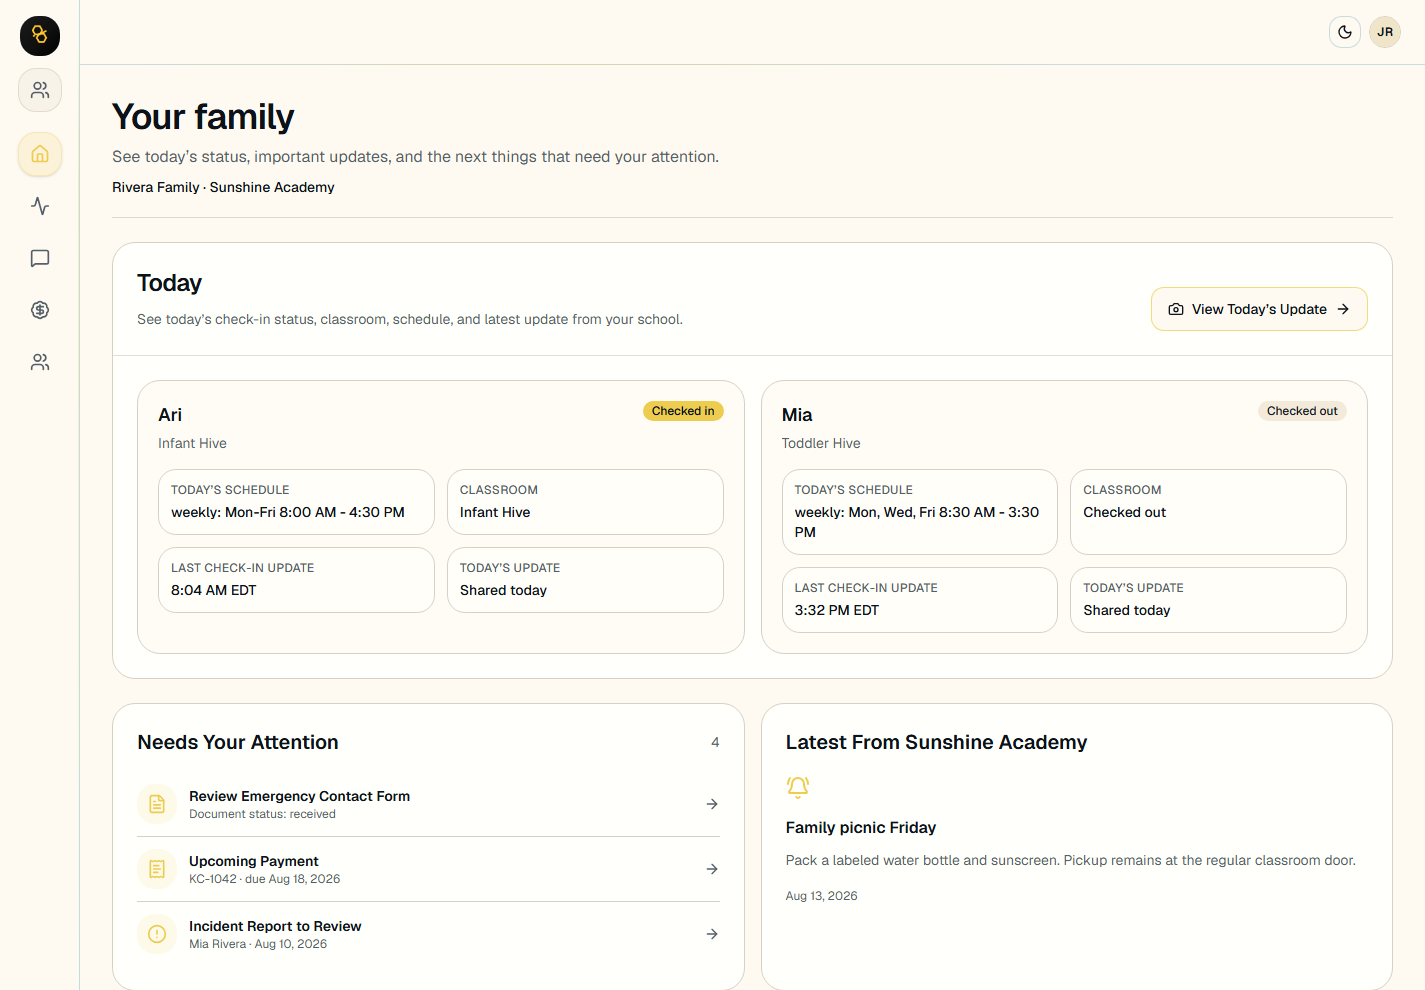
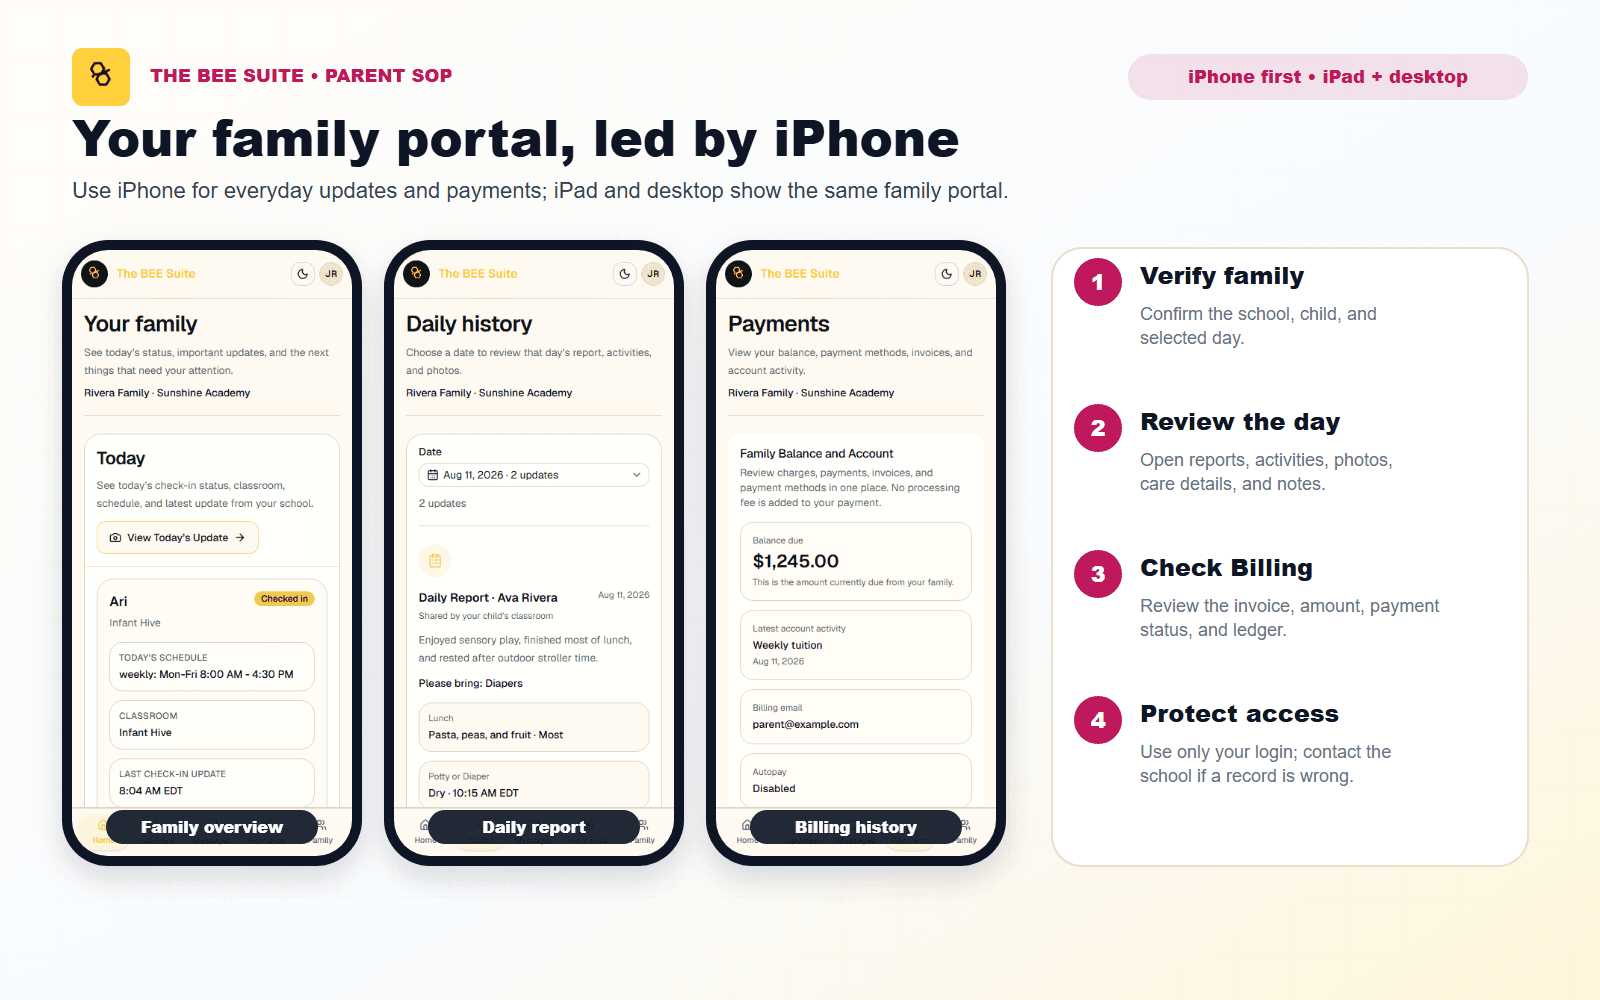
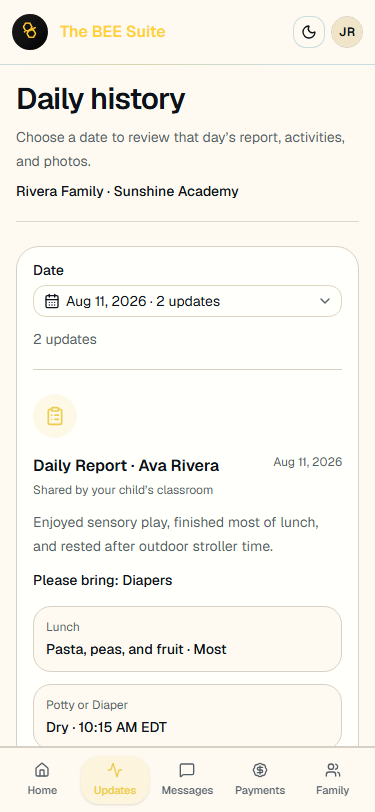
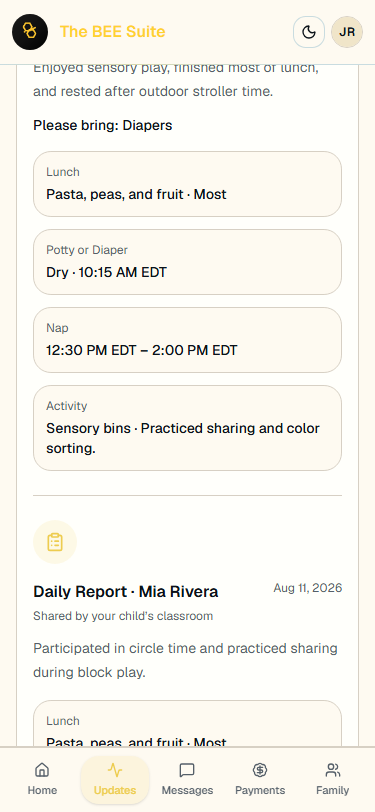
Check child updates, messages, photos, documents, invoices, payment methods, and school notices.
Child updates and notices
Routine family questions
Call school for urgent items
Screens
Tap a screen to open the full view.
Step-by-step guide
- 1Open the Parent Portal from its Home Screen icon or the parent login page.
- 2Confirm the child profile, school, classroom, and authorized contacts are correct.
- 3Review messages, classroom updates, daily reports, photos, documents, and balances.
- 4Send routine questions through the portal when available.
- 5Contact the school directly for urgent pickup, custody, health, emergency, billing policy, or same-day record corrections.
School System Operating Manual
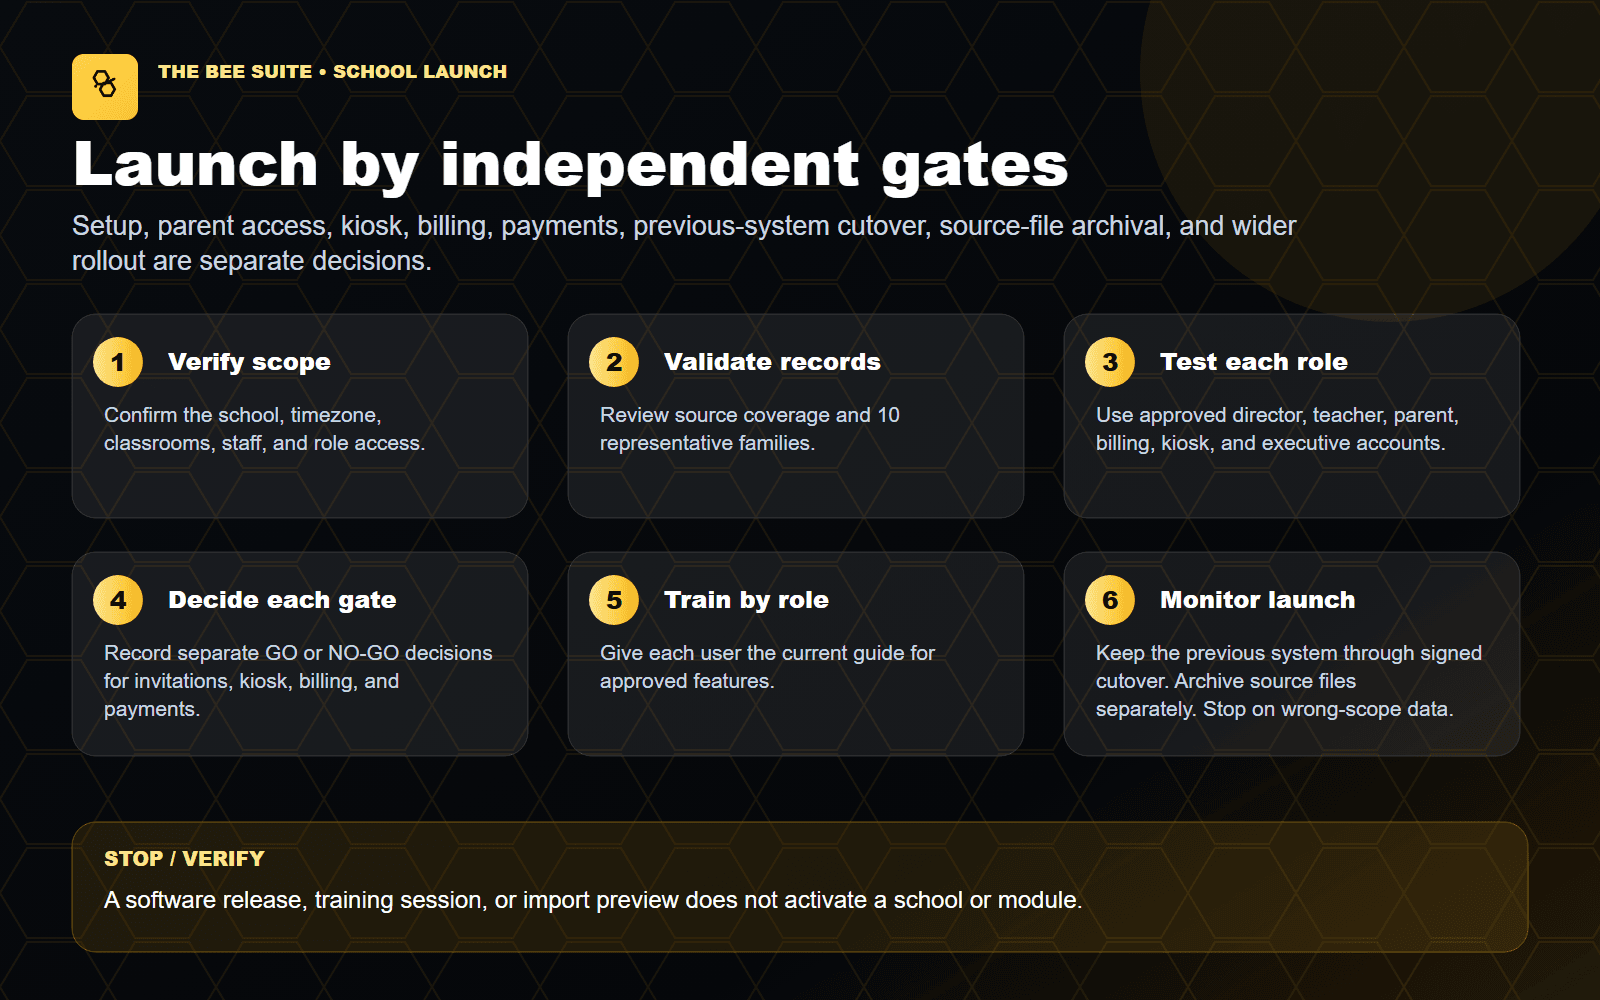
Launch The BEE Suite as the school system of record across roles, campuses, and daily workflows.
Schools, roles, billing
Staff and families
Reports and exceptions
Step-by-step guide
- 1Approve the school profile, rooms, staff roles, family records, tuition rules, billing cadence, and source-data reconciliation.
- 2Test real role and school isolation for executives, directors, billing admins, teachers, parents, and kiosk users.
- 3Keep setup, parent invitations, kiosk/PIN, billing, parent payments, previous-system cutover, source-file archival, mobile stores, and wider-wave approval as independent dated gates.
- 4Train directors, teachers, billing staff, and families only on features approved for that school.
- 5Keep the previous system as the source of record until reconciliation, ownership, and the signed cutover decision are complete.
- 6A HELD OFF gate is not a PASS. Record each GO or NO-GO and its owner; stop the affected flow when evidence is missing.
School Data Clean-Start Guide
Verify families, children, relationships, safety records, classrooms, staff, tuition, and balances before launch.
Source evidence to BEE data
Document every exception
Decide each gate separately
Step-by-step guide
- 1Confirm the correct school and director role. Stop immediately if another school's records are visible.
- 2Make sure your current review packet is marked READY_FOR_DIRECTOR_REVIEW and matches your school and export date.
- 3Check each current child's family, classroom, schedule, safety information, tuition, and balance. Mark anything missing or unclear instead of guessing.
- 4Review allergies, medical information, medications, emergency contacts, authorized pickups, and custody restrictions separately. A blank field is not proof that none exists.
- 5Check each child's tuition amount, billing schedule, description, and start date. Check each family's dated opening balance and keep agency responsibility separate from the parent's family balance.
- 6Spot-check at least 10 current families. Record every correction, who owns it, and the result after it is fixed and checked again.
- 7Keep parent invitations, staff access, kiosk/PIN, attendance, billing, payments, messaging, and previous-system retirement held until each receives its own approval.
Executive Admin Guide
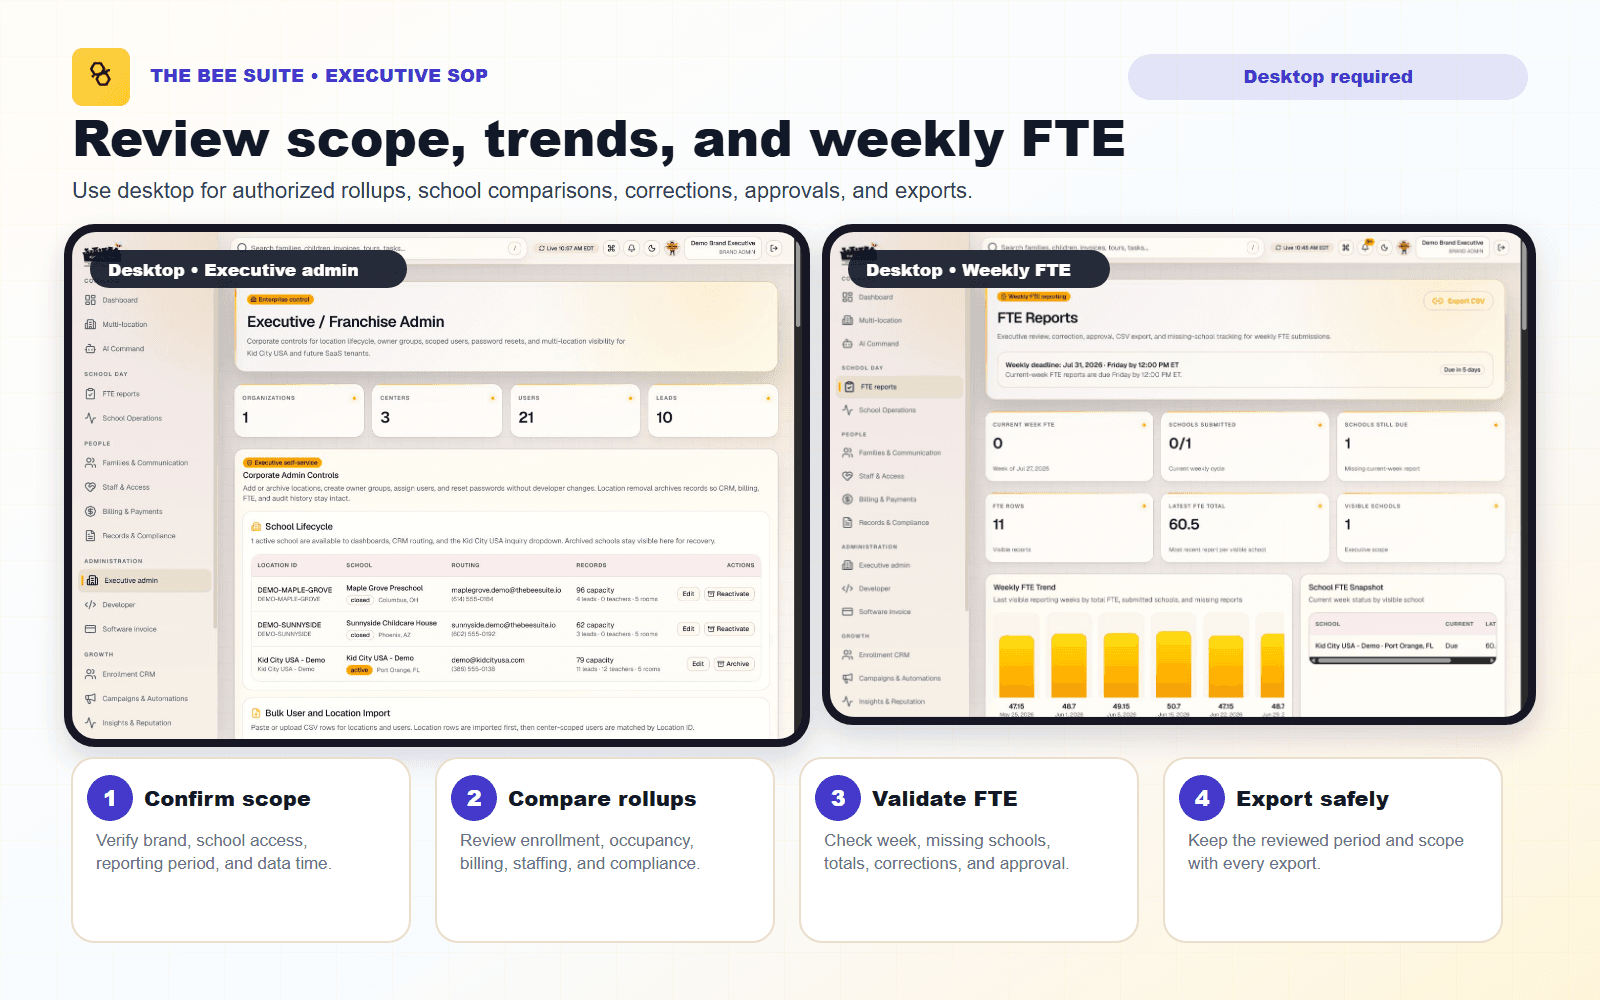
Monitor multi-location operations, access controls, staffing signals, financial readiness, and reporting.
Locations and exceptions
Roles and permissions
Assign accountable owners
Screens
Tap a screen to open the full view.
Step-by-step guide
- 1Log in through the executive workspace.
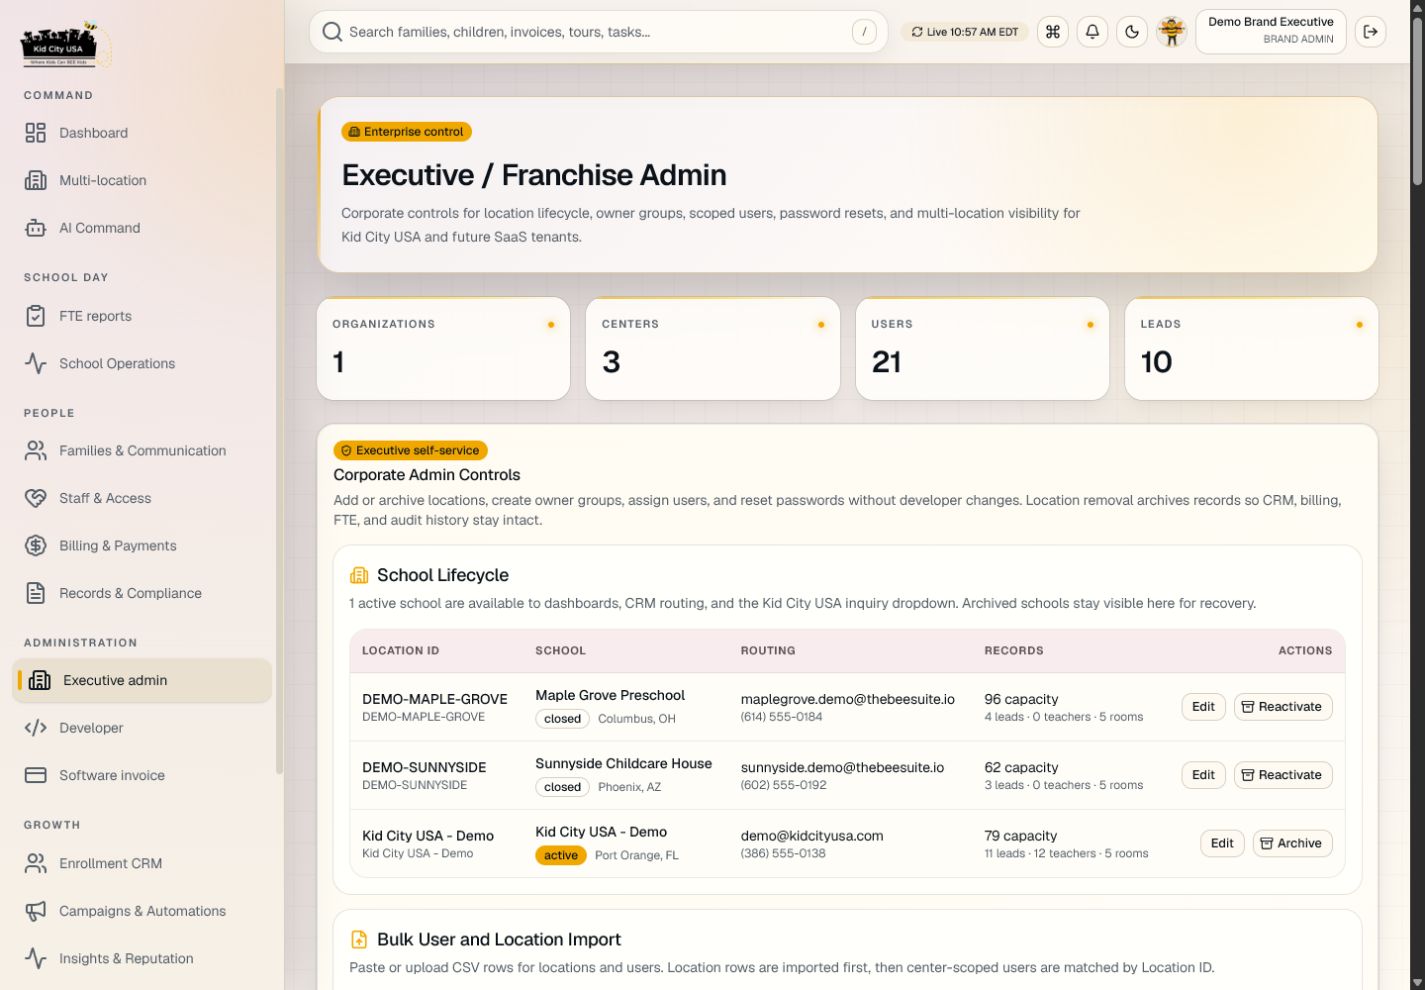
- 2Review location status, enrollment pipeline, occupancy, attendance, staffing, billing readiness, and unresolved exceptions.
- 3Confirm each user has the least access needed for their job.
- 4Review high-risk records such as custody, medical, incident, payment, and compliance changes.
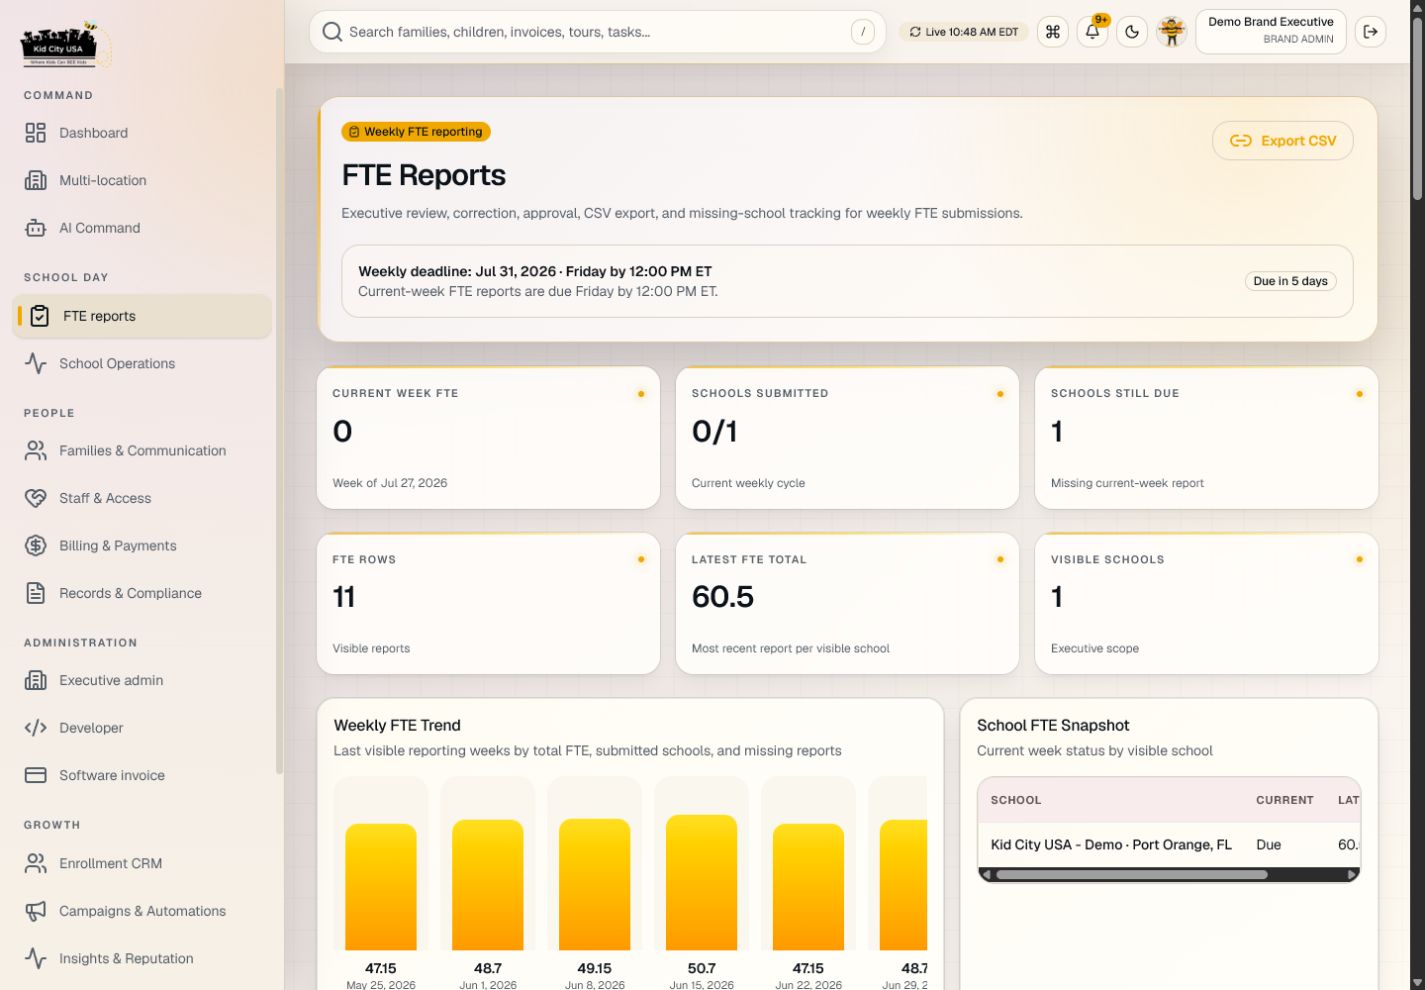
- 5For FTE, select the intended reporting period, review the saved draft for that period, and submit by Friday at 12 PM Eastern.
- 6Use reporting to identify location-level blockers and assign owners for follow-up.
Director Guide
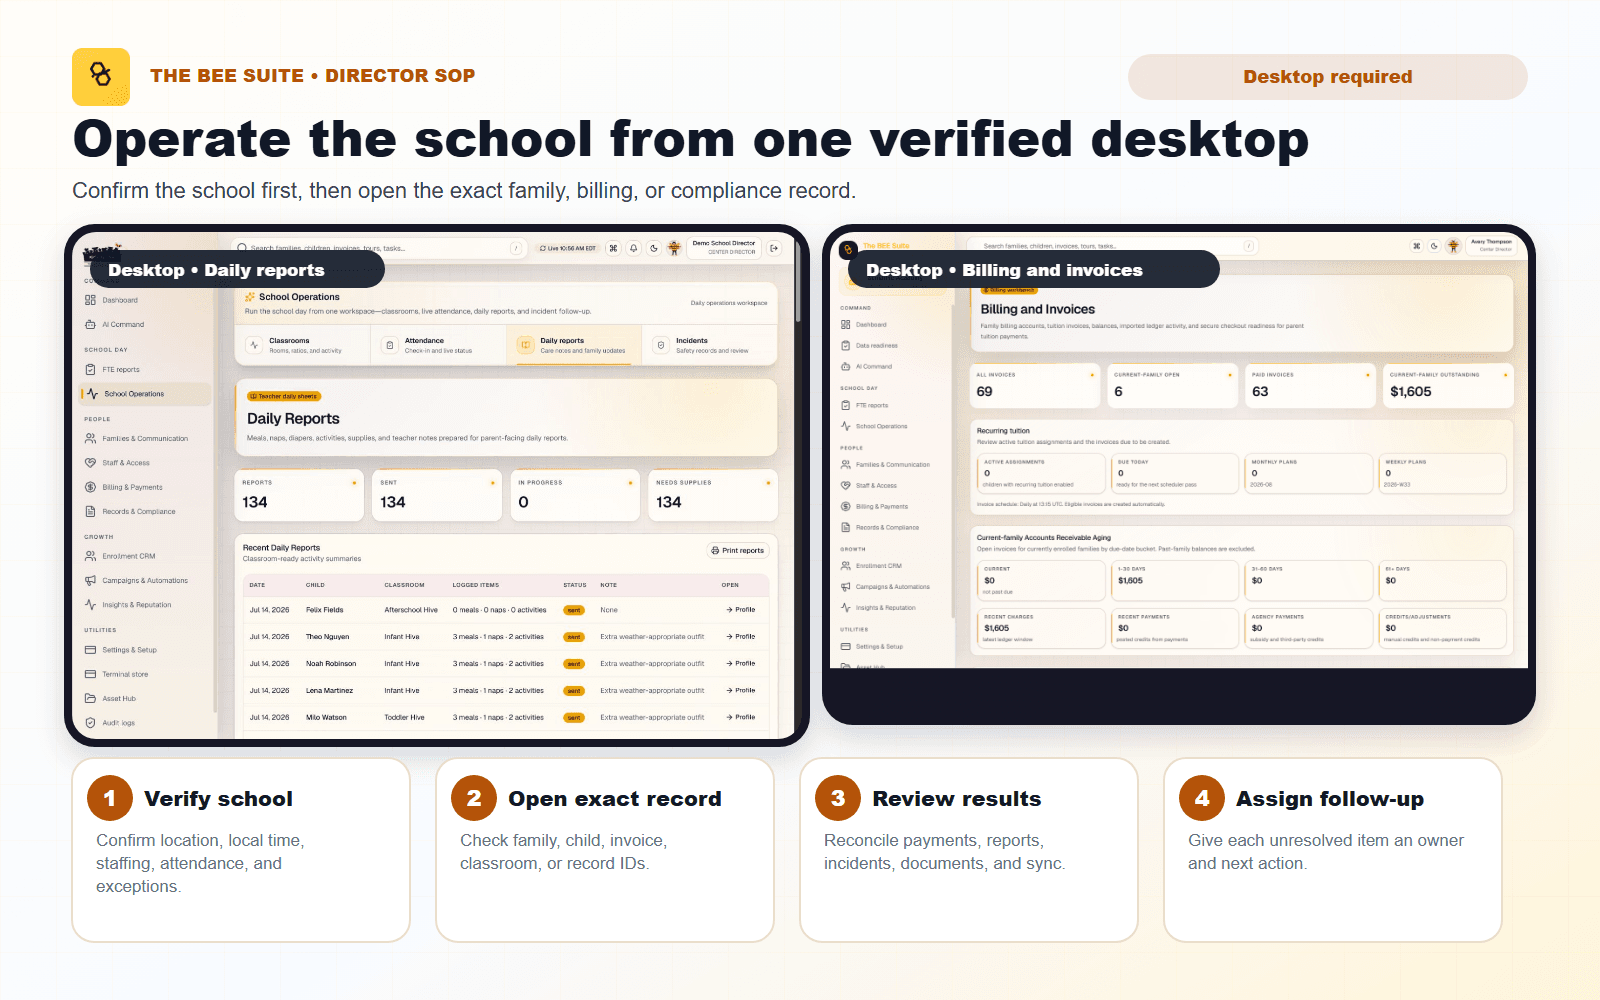
Run daily school operations from enrollment through attendance, billing readiness, staffing, and family communication.
Attendance and staffing
Enrollment and classroom flow
Exceptions and follow-up
Screens
Tap a screen to open the full view.
Step-by-step guide
- 1Sign in at https://thebeesuite.io/directors and confirm the correct school before opening or changing records.
- 2Use the Dashboard or School Operations > Enrollment status to search the current roster and export CSV or PDF, or print it.
- 3Use Families & Communication for Families, Children, Messages, and Media review; use Add Family, Parent + Child for a new enrollment.
- 4Confirm guardian email, phone, relationship, linked children, enrollment status, classroom, and safety notes before sending Parent Portal access.
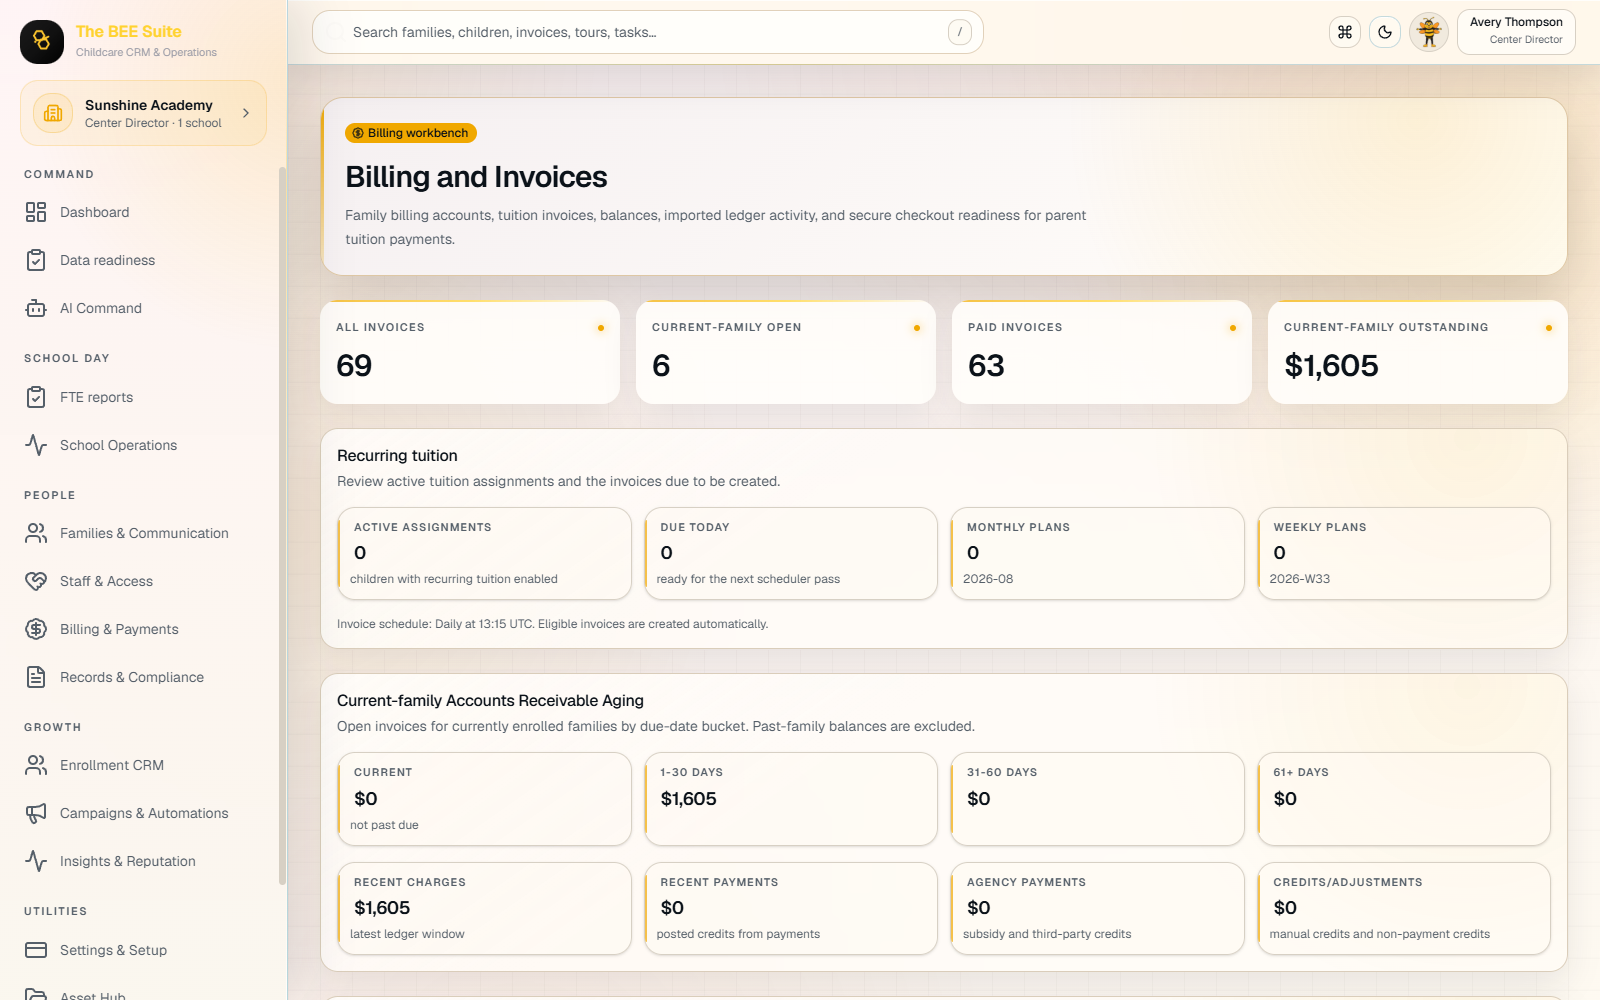
- 5Review the active per-child tuition breakdown and family total in Payments; withdrawn records stay in Past & Other review.
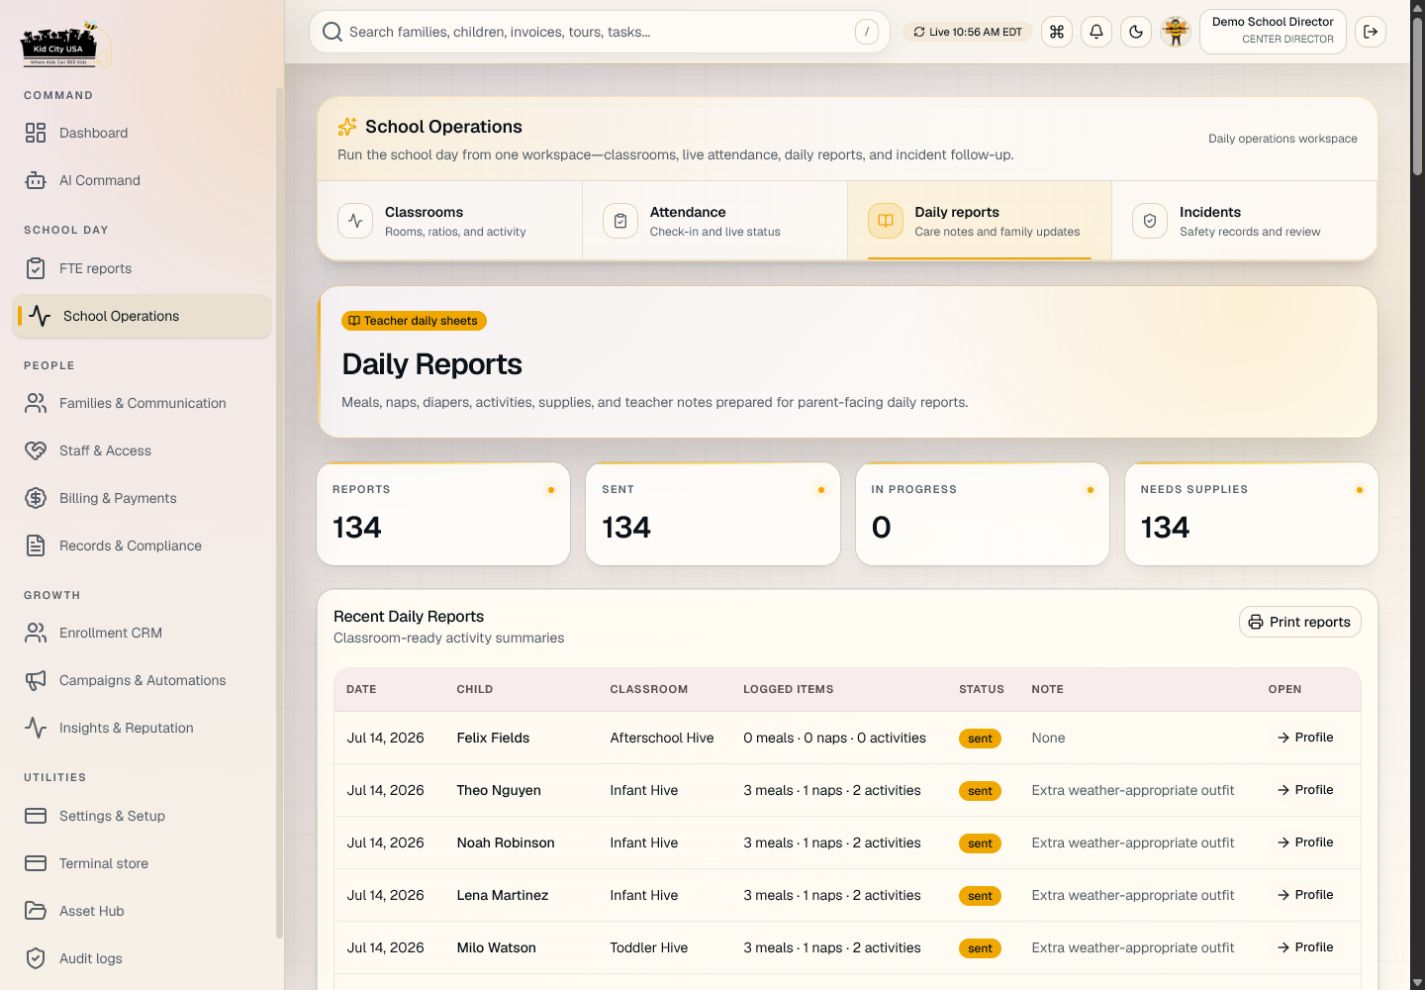
- 6Monitor classroom attendance, daily reports, incidents, and photos throughout the school day.
- 7Wait for saved or sent confirmation before repeating an action; reopen the specific record when fresh verification is needed.
Registration Forms & Parent App Invitations
Know when to send the enrollment packet and when to invite an already saved guardian into the parent app.
School, guardian, and child
Send from Parent Portal Access
Accepted, delivered, or follow-up
Step-by-step guide
- 1Registration and parent app access are separate: send the school registration form when paperwork is still needed; send a Parent App Invite after the family, guardian, and child are saved and verified.
- 2From Enrollment CRM > Leads, select the lead and choose Send registration form. To copy the direct school link, use Dashboard > Explore dashboard details > Registration and enrollment forms > the correct school card > Copy registration link. Confirm the school in Preview form before sharing.
- 3Review the submitted packet in CRM Application Submitted and Registration Packets > Forms. Reconcile the existing lead, packet and saved family before creating anything new; a submitted form is not a completed enrollment.
- 4Only when no existing record matches and manual entry is the approved next step, use Families & Communication > Families > Add Family, Parent + Child. Confirm School / center and verified guardian/child details. Leave Prior balance owed at cutover blank or 0 unless verified debt exists.
- 5Save, reopen the family, and confirm the sticky school/family context, guardian relationship, personal email, phone, linked children, active or pending enrollment, classroom, and safety notes.
- 6If the family is already enrolled and its record is complete, skip the registration form. Scroll to Parent Portal Access, select the exact guardian, and choose Send Parent App Invite. A safely entered current family does not require a prior import batch.
- 7Read the invitation result: Accepted means the email service received it for delivery; Delivered confirms it reached the recipient; Failed or Expired needs follow-up.
- 8If Copy Invitation for Manual Email appears, send that copy only from the approved school email account to the guardian email shown.
- 9Use Resend Parent App Invite for an existing linked parent. The current password is preserved; the parent can choose Forgot password.
- 10After the account is linked, Send Parent Feature Guide & FAQ may be used.
- 11Stop if the wrong family or child appears, an identity is ambiguous, or the email belongs to conflicting guardians. Correct the existing record; do not create a duplicate.
Teacher Guide
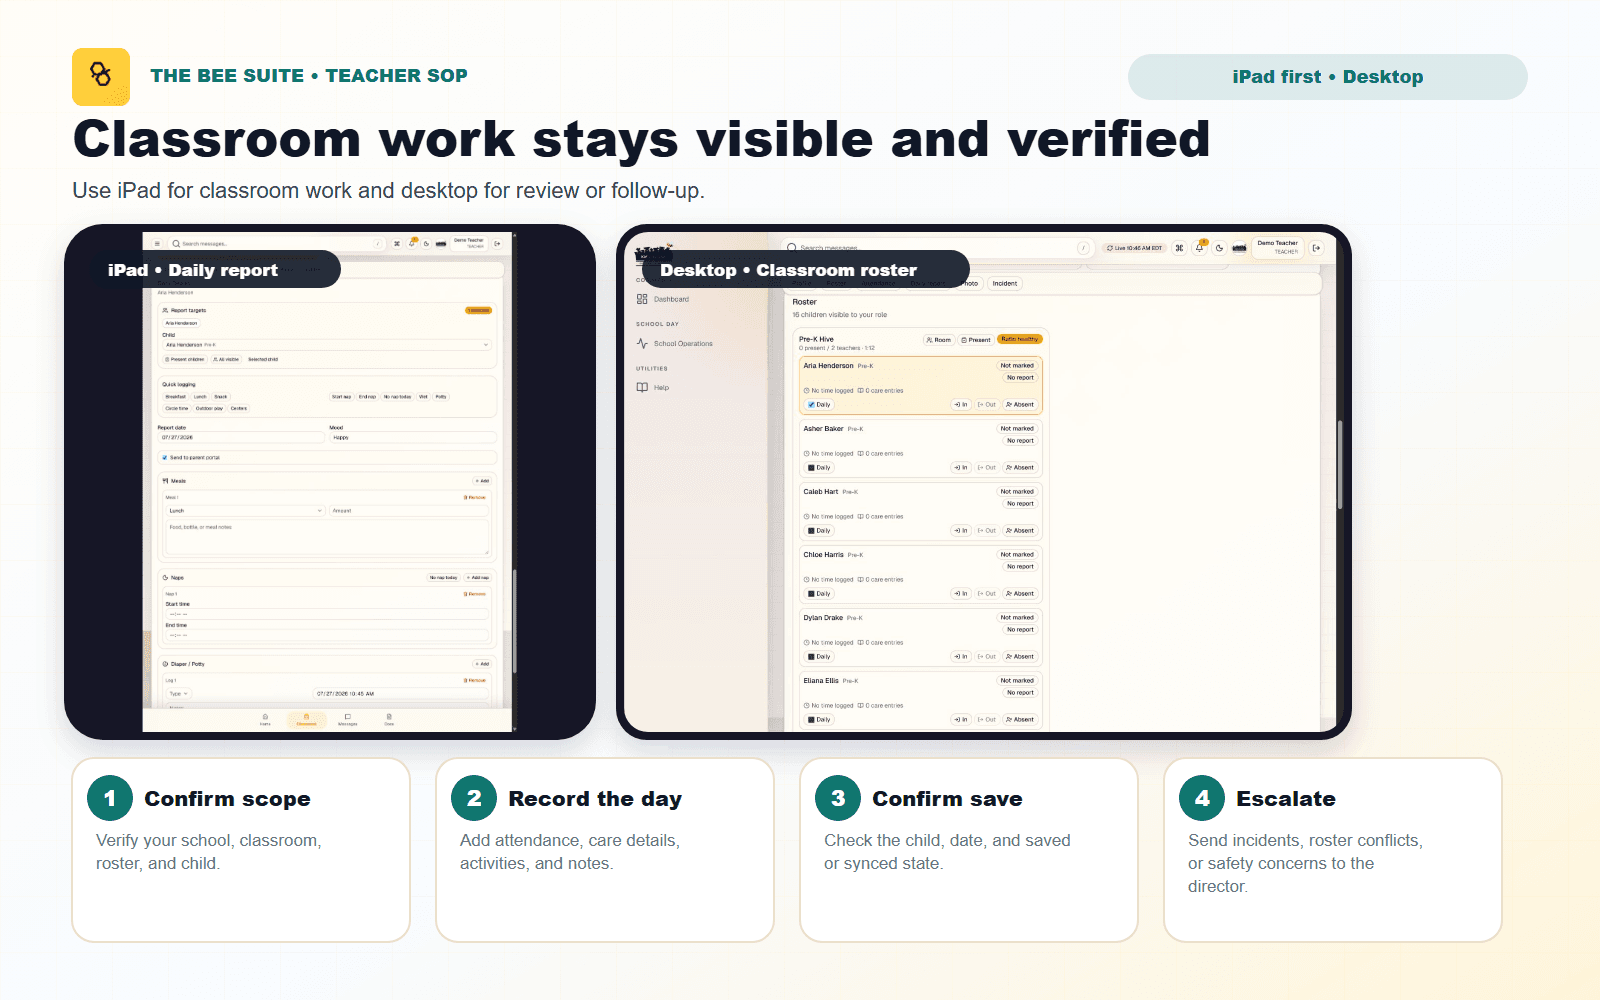
Use the classroom workspace for attendance, daily reports, incidents, photos, and routine family updates.
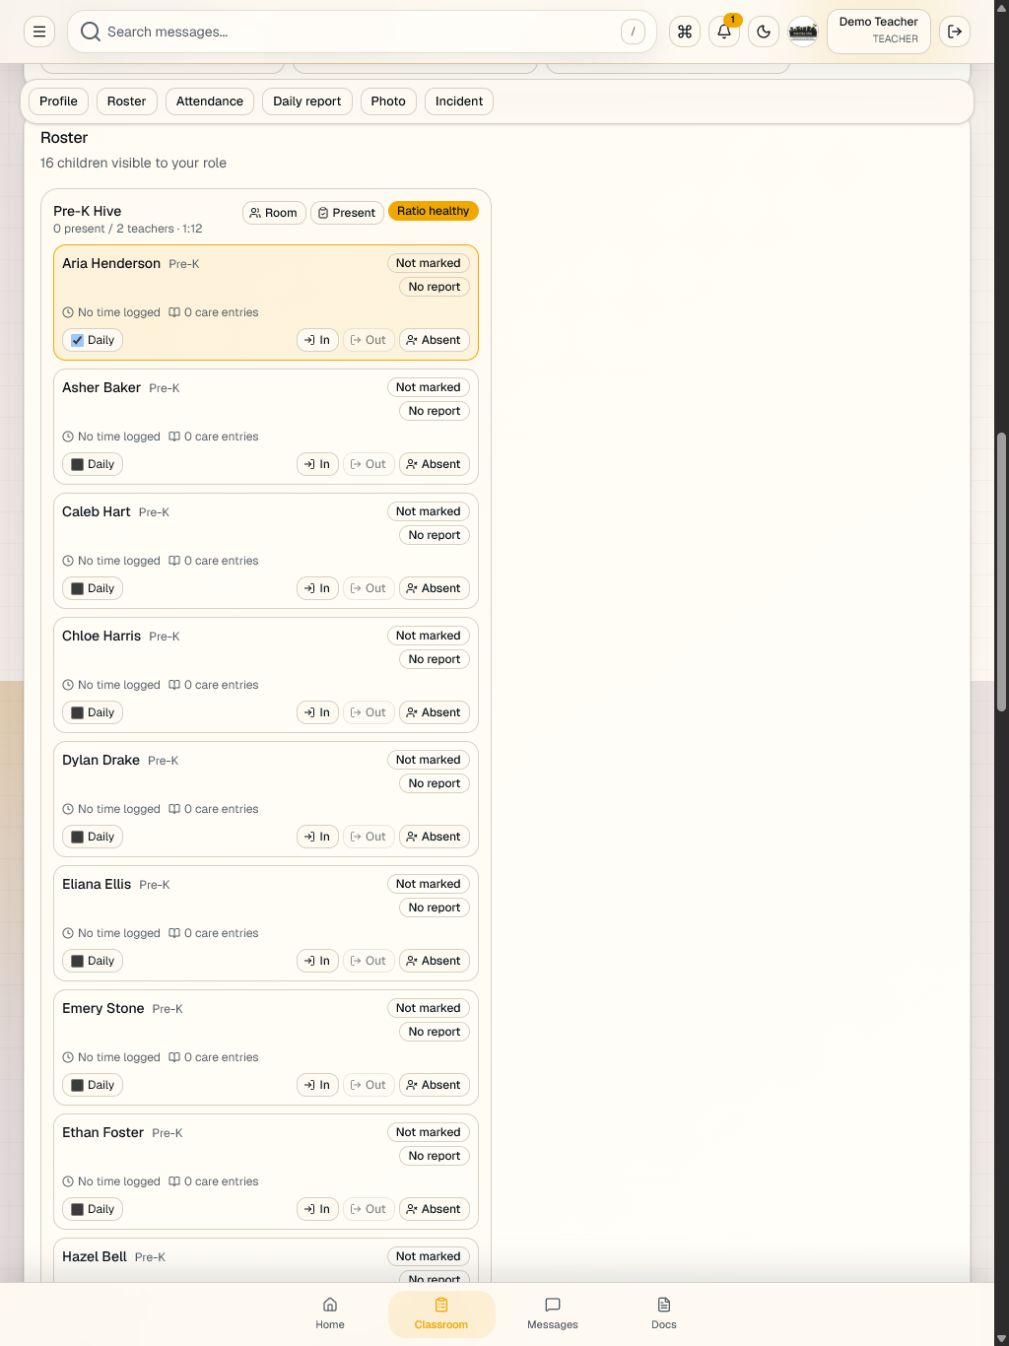
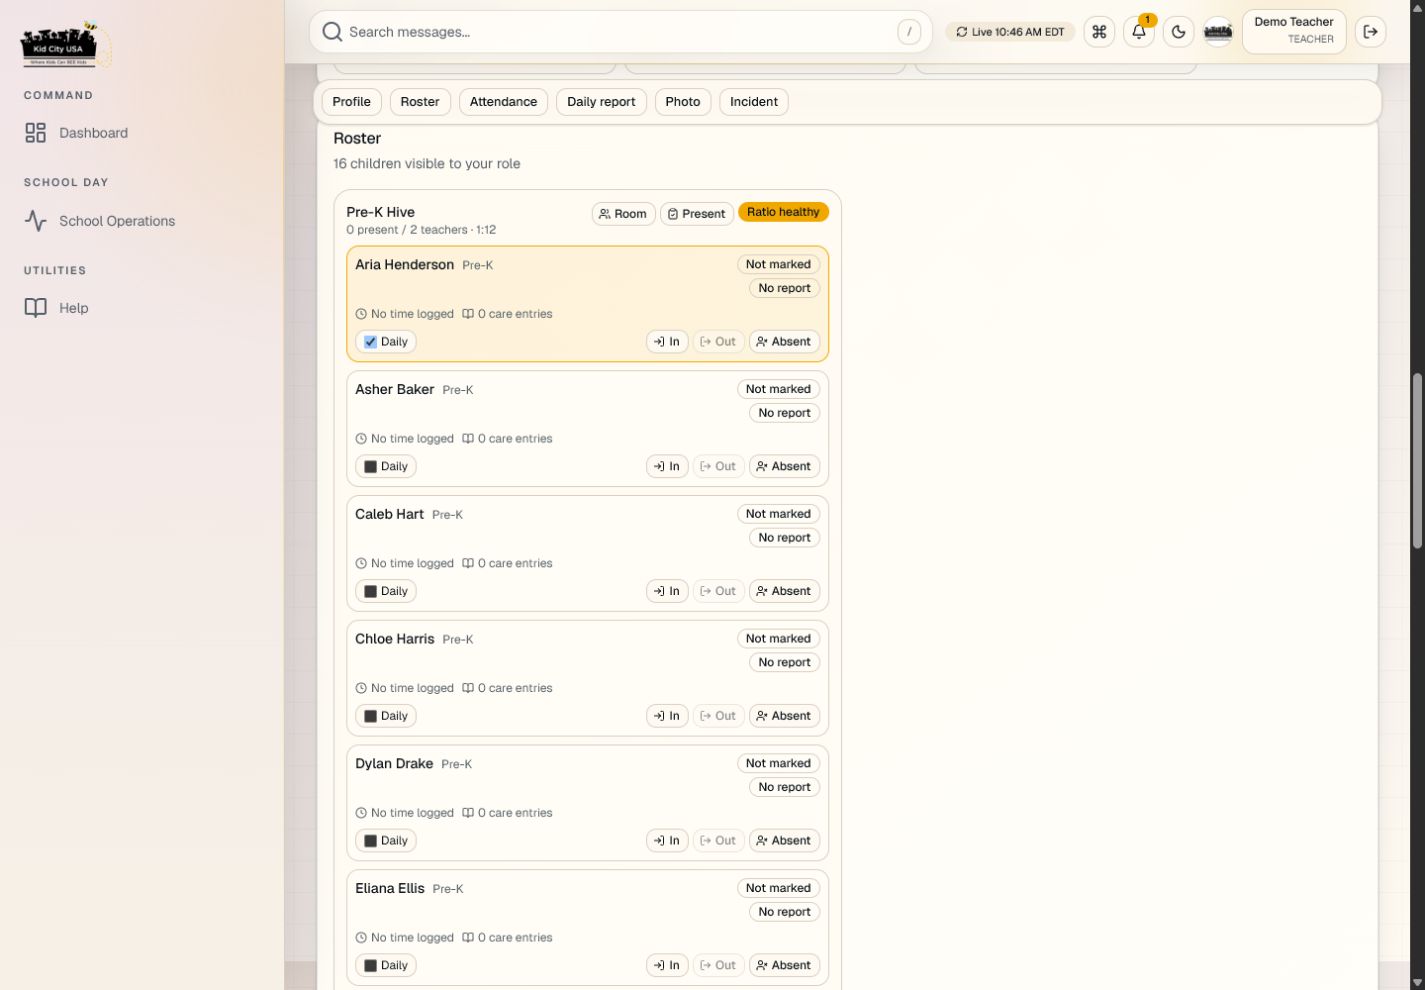
Confirm children present
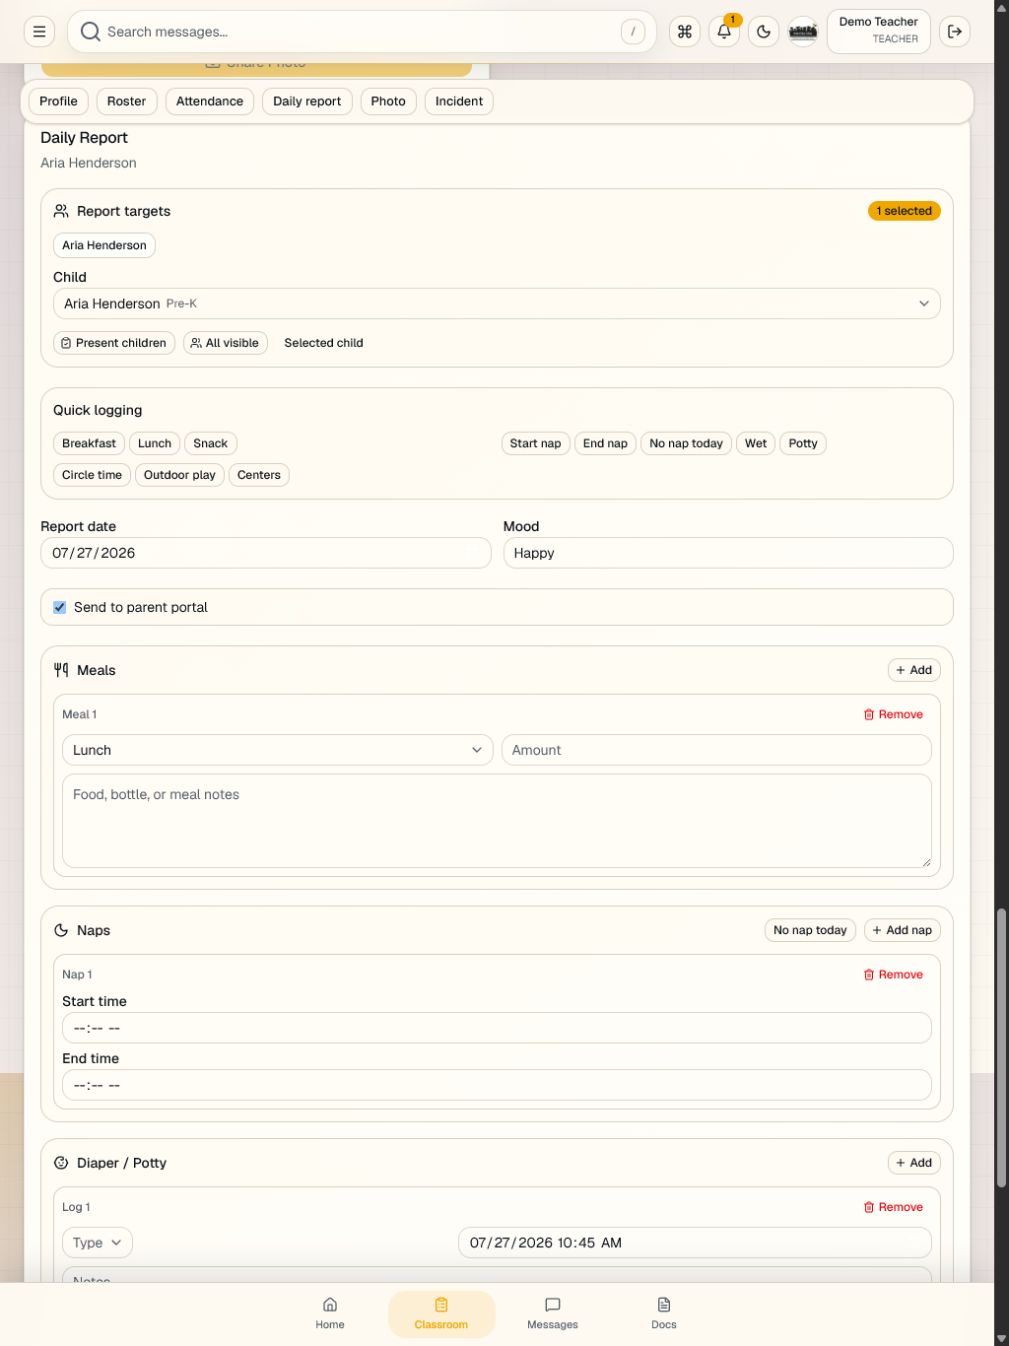
Daily logs and incidents
Director handles urgent issues
Screens
Tap a screen to open the full view.
Step-by-step guide
- 1Log in on the assigned classroom device only.
- 2Confirm the roster and mark attendance as children arrive and leave using the school-local time shown.
- 3Record meals, naps, activities, supplies, notes, and incidents according to school policy.
- 4Upload classroom photos only when allowed by the school and child permissions.
- 5Confirm the saved or unsaved state before leaving a record. If the device was offline, wait for sync and do not repeat the action.
- 6Send routine classroom messages through approved channels and escalate urgent issues to the director immediately.
Agency Payment & Reconciliation
Match an approved agency claim, record an ACH, check, or portal remittance, and reconcile it in a separate agency ledger without changing family responsibility.
Open the complete agency SOPClaim and remittance evidence
Approved agency payment
Claim, ledger, and family view
Step-by-step guide
- 1Sign in at https://thebeesuite.io/directors, confirm the exact school, then go to Billing & Payments > Billing & invoices > Agency receivables.
- 2Continue only when the school-specific agency program shows Ready and the provider/vendor, submission, and payment setup are documented.
- 3Match the agency, child, authorization, service period, approved claim, amount, paid date, method, and unique remittance reference to the agency evidence.
- 4Before exact-school activation, choose Record remittance on the approved claim; enter the exact amount, paid date, method, and unique reference, save once, then refresh and verify the recorded result.
- 5Only after release and exact-school activation, use Prepare deposit batch or Prepare remittance to stage the evidence and allocation for a different billing administrator or accounting reviewer to approve.
- 6Refresh and verify the claim paid amount and status, deposit allocation, dedicated agency-ledger payment and balance, and unchanged parent-visible family responsibility.
- 7Before activation, reverse an incorrect direct remittance with a reason; after activation, reverse the deposit batch and prepare its correction for independent review. Keep the original evidence.
Billing Admin Guide
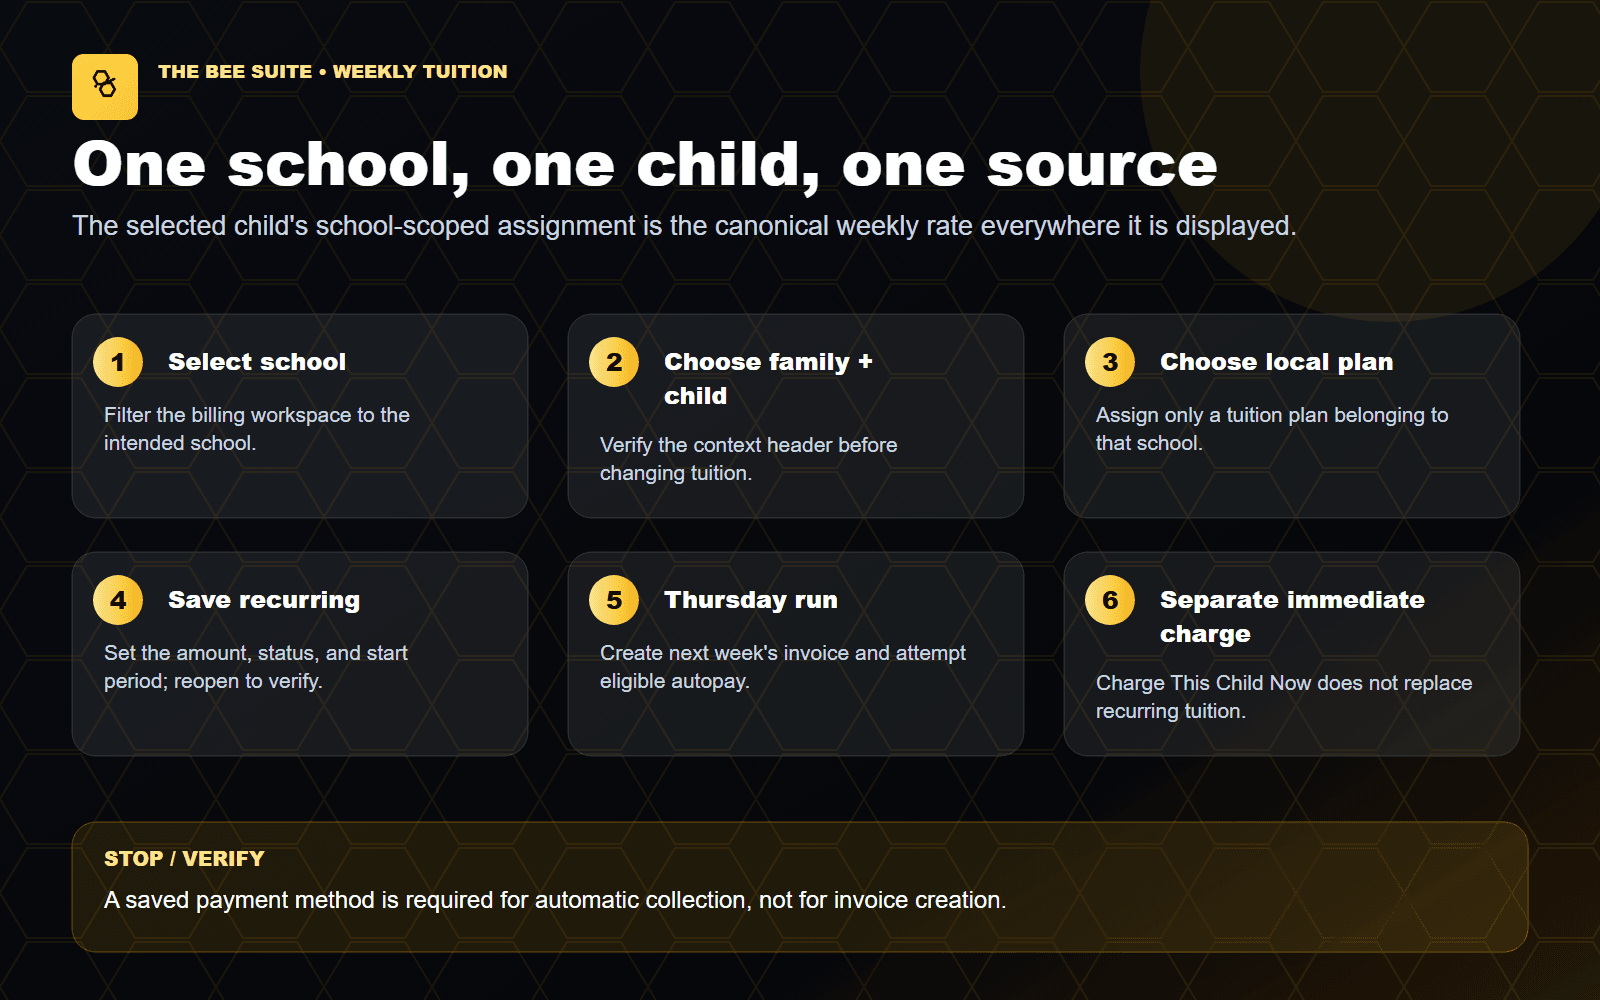
Manage invoices, balances, payment methods, autopay readiness, exceptions, and family payment questions.
Invoices and balances
Payments and autopay
Exceptions and disputes
Step-by-step guide
- 1Review tuition plans for the selected school, assigned child rates, discounts, balances, credits, failed payments, and upcoming autopay runs.
- 2Confirm the weekly Thursday schedule or four-week cadence, the next unbilled service period, and the assigned child's canonical rate before invoices are created.
- 3For one approved late fee or vacation credit, use Common billing tasks > One-time fee / credit. Review the projected balance and do not change the child's saved recurring tuition for a one-week exception.
- 4Confirm family payment methods belong to the correct account; the parent flow presents card first while secure bank choices remain available.
- 5For an in-person card payment, use the school's connected Terminal location and network reader only while the parent is present.
- 6Reconcile invoices, Stripe events, ledger entries, and payout destination. Document exceptions, reversals, credits, and parent conversations.
- 7Escalate duplicate charges, reader mismatches, disputes, suspected fraud, custody-related billing questions, and policy decisions.
Kiosk and Authorized Pickup Guide
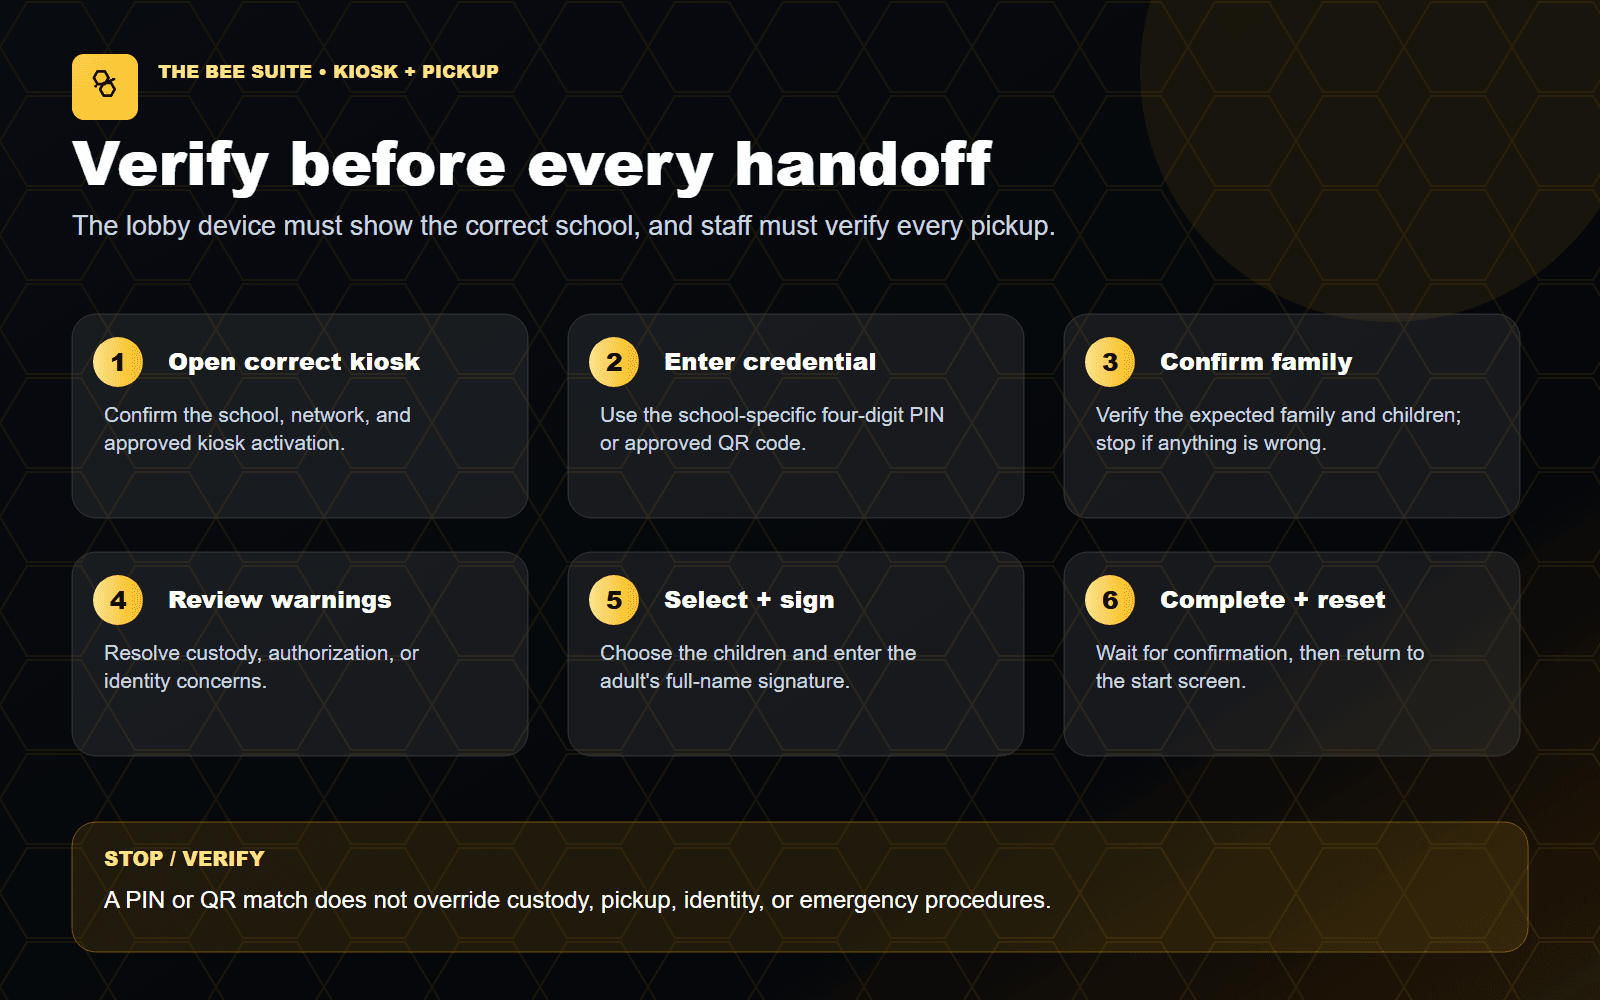
Use the lobby kiosk for check-in, check-out, staff clock events, PINs, QR codes, and pickup verification.
Correct location and tablet
PIN, QR, or approved method
Identity before release
Step-by-step guide
- 1Use the kiosk only after the school has a separate dated kiosk/PIN approval.
- 2Open the kiosk workflow on the lobby tablet and confirm it is connected to the correct location.
- 3Keep the tablet mounted, charged, and visible to authorized staff.
- 4Families use the approved PIN, QR code, or school-approved check-in method.
- 5Staff verify identity before releasing a child to a new or unfamiliar authorized pickup.
- 6Escalate custody conflicts, blocked pickups, missing authorization, and emergency issues to the director before release.